NEIGHBORS READY!
  • Home
  • Family Prep
    • Go Bags
    • Stay Informed
    • Emergency Plan
    • Water Supplies
    • Sanitation and Hygiene
    • Plan Food
    • Home Hazards
  • Community Prep
    • Neighborhood Prep
    • Be 2 Weeks Ready
    • Evacuation & Assembly
    • Community Caches
    • Training Opportunities
  • News & Events
    • Ready! News
    • Our Events
  • Hazards
    • Home Fires
  • Resources
    • QuakeUp! NW
    • Oregon.gov
    • Washington County Prep
    • Beaverton Emergency Mgmt
    • Tualatin Valley Fire & Rescue
    • CDC
    • FEMA
    • Ready.gov
    • Red Cross
  • About Us
  • Contact
    • Email Us
    • Newsletter Signup
    • TEST Subscribe
    • Volunteer
Family Prep
Pack Go Bags & Kits
Stay Informed
Family Emergency Plan

Store Water & Supplies
Sanitation & Hygiene
Store Food for Cooking
Eliminate Home Hazards​
What Can't you live Without? Put it in your Go Bag Now. 

Go Bags & Emergency Kits

​In a disaster, you may have to evacuate rapidly. It's important to have your emergency supplies packed and ready to go. In this Neighbors Ready! QuakeUp! video, you’ll learn about the 3 evacuation levels so you’ll know when to leave during an evolving emergency, and how to organize your emergency supply kits to make sure you have what you need and are ready to go. We'll provide lists with suggestions on what to include, and we'll discuss how to pack your bags efficiently. We’ll talk about three different types of kits: under-bed kits, go bags (for 1 - 2 days), and evacuation kits (for 3 days - 2 weeks). Scroll down to find additional resources for further research, including a transcript of the presentation with speaker notes. 
Want to take notes? Download the slide deck with speaker notes.

Types of Emergency Kits

Go bags and emergency kits come in many sizes and shapes depending on their purpose and your needs. It's easy to get confused and overwhelmed, so we suggest you start small and gather your supplies in one place, starting with supplies you already have on hand. Functionally, three different types of emergency go kits include: 
  • Under-bed kits - for safely getting out of bed and out of the house in a disaster 
  • Go bags - fast grab-and-go supply kits with survival essentials for 1-2 days, giving you enough supplies and tools during a short journey to safety. You may be away from home for work, school, or at another place when a disaster strikes. Carry it hidden in your car or store it at places where you spend a lot time regularly.
  • Evacuation kits - kits with supplies and tools to help you survive for a longer duration, such as 3 days to 2 weeks. Evacuation kits build on the supplies you already have in your go bags. ​​

Under-Bed Kit Basics

You spend up to a third of your life sleeping. Prepare under-bed safety kits to help you and family safely get out of the house in a disaster that damages your home. Protect your feet, hands, and head. 
Picture
Consider including: 
  • Sturdy shoes and heavy gloves
  • Protective eyewear, N95 dust mask
  • Hard hat or bike helmet
  • Flashlight, whistle
  • HELP/OK sign, neighborhood map and contact list
Containers for underbed kits
You probably already have a container in your home: backpacks, old pillow cases, shipping boxes, space saver vacuum storage bags, or even a heavy duty trash bag. A bed caddy or pocket is a great idea for storing important items that you use everyday, such as glasses, a flashlight, and your cell phone; it will keep all these important items in place and within reach, especially important if the lights are out or during an earthquake. Consider tying or fastening your kit to a bed leg to keep it in place during an earthquake. 
On a Budget?
Use supplies you already have or shop at discount stores.​

Picture

What goes into a Go Bag?

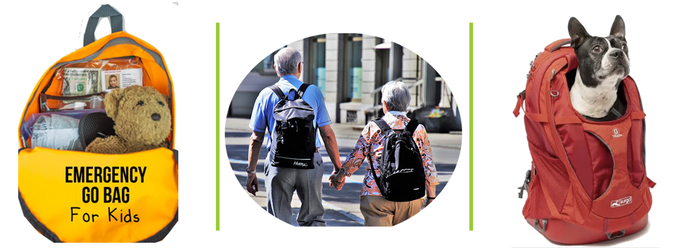
Disasters can strike at any time. Go bags, or bug-out bags, contain items you need to help you stay safe no matter where you are, with supplies for a minimum of 1-2 days. Your go bag should:
  • Reflect your personal needs
  • Be accessible wherever you go
  • Include essentials a variety of weather conditions.  
​Every member of the family should have a go bag, including your pets. Beyond the basics, what you put in each go bag depends on the special needs of the go bag owner. Start with a list of go bag supplies, and customize it as needed. 
​Check out this video: Trish Reading, our go bag expert, shares what she packs in her bag and why. 
Picture
Picture

​Evacuation Bags

Evacuation kits provide supplies and tools to help you survive for a longer duration, such as 3 days to 2 weeks. Evacuation kits build on the supplies you've packed in your go bags. During an evacuation, you may need to go to a shelter or a friend's home, for days, weeks, a month. Here's a minimum list: 
  • Start with your Go Bag, including protection for head, hands, feet. Flashlight whistle, chargers, masks, water, snack, critical medications, money, critical documents.
  • Next, think about what you may need for a longer period of time, such as: extra clothing, hoodie, jacket, poncho; more personal hygiene supplies and medications for two weeks, and so on. 
Download our go bag checklists as a list you can build from. You'll also find these lists in our "Get Prepared Now!" booklet, along with a lot more tips and information to help you get prepared. ​
Picture
Click to download the checklist

A Bag for Each Family Member

Every member of the family should have a go bag, personalized to their particular needs, including your pets. Here are some tips for each type of family member:
  • Infants: Keep emergency supplies for infants in their own dedicated baby duffel bag. Their preparedness needs change monthly (in terms of food, diaper sizes, and so on). You'll want to update their items more frequently than other family members.
  • Growing children: Pack their clothing 1 to 2 sizes larger, and include an item for quiet entertainment and comfort, such as a favorite toy.
  • Pets: Pack a separate bag for pets, with extra water and food, collar and restraints, and plastic bags for dog doo. Some shelters won't accept uncrated animals, so an all-in-one pack with a crate can be ideal.
  • Seniors: Pack personal medical equipment, aids, canes, and doctor's contact information. Consider how much the senior can lift when selecting a bag.  
  • Persons with disabilities:  Consider the special needs of people with disabilities--medications, equipment, and so on--and pack accordingly. 
Picture

Choosing a Bag

There are many different designs and types of bags to chose from. When looking for a bag for your kits, consider the following: 
  • Look for a high-capacity backpack with many built-in storage compartments and modular pouches with clear tops for quick and easy identification. 
  • If you need more supplies than will fit in a single backpack, consider adding a duffel bag to hold your additional stuff.
  • Consider how much weight the person carrying the bag can lift, and any physical limitations. For many seniors, a bag with wheels is a requirement. 
For households with 3 or more family members, consider organizing:
  • By Person. Label it with their name and store all of their needs in it including medications and personal items.
  • Add a personalized container (like a pouch) to your emergency kit for each family member.
Picture

Tips for Organizing Your Bags

Picture
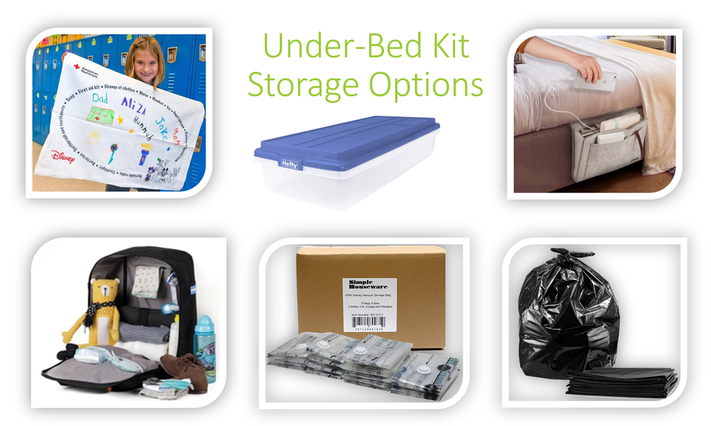
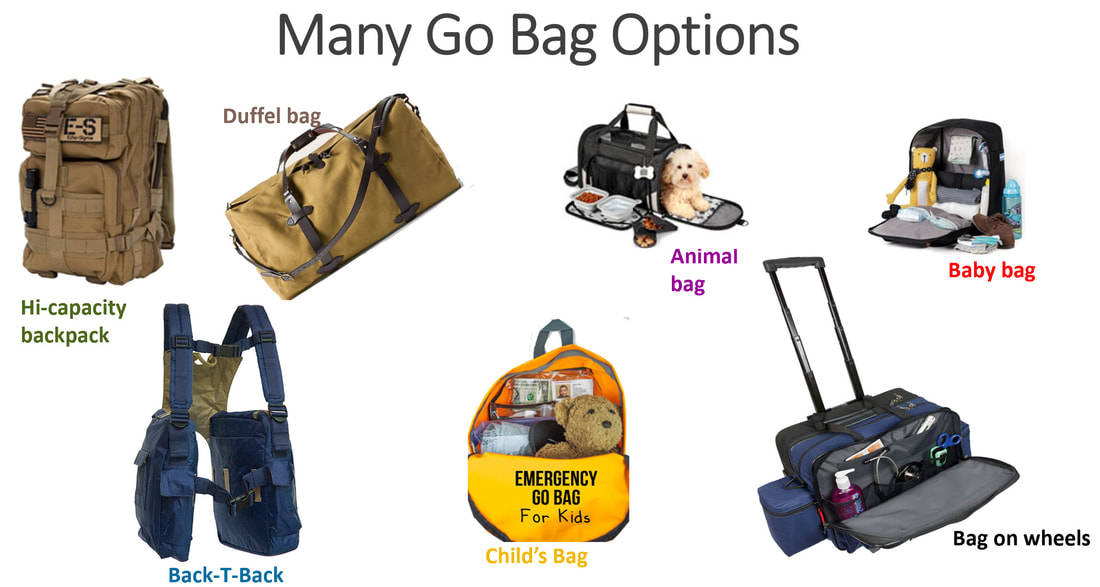
Many people organize their go bags and evacuation kits using off-the-shelf school backpacks. But with only one compartment, all your stuff is dumped in, making it hard to find what you need in a hurry. Locating what you need involves wading through layers and layers of stuff, and supplies on the bottom get crushed. 
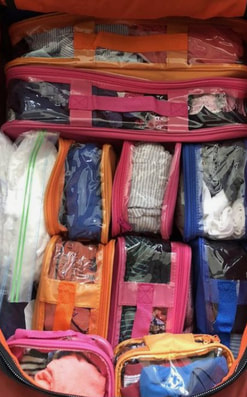
Organize supply groups
One way to better organize your supplies is to use clear cubes or ziplock bags to organize different types of supplies together. For example, if you store all of the things that could expire together, it'll make the job of refreshing your evacuation bag much easier. 
Optimize the balance of weight, sizes and frequency of use
Evacuation bags may get quite heavy. Organizing your stuff in a way that balances the weight, size of items, and their frequency of use, can improve your ability to carry what you need. We found some tips from experienced backpackers helpful. Ideas include: 
  • Pack side pockets first, with water, food, first aid kit, and map
  • Pack bulky and lighter items in the bottom, such as winter jacket and extra cloths
  • Heavier items should go in the small of your back, but no sharp items next to your back
  • Keep waterproof and rain garments easily accessible
About weight: For some people, a bag with wheels is a requirement. If you are carrying your pack on your back, your pack should not weigh more than 1/4 to 1/3rd your body weight. 
Picture
Source: "How to pack a backpack," https://www.msrgear.com/blog/how-to-pack-a-backpack/

Why do an inventory periodically?

If you've pack your bag once, and then bury it in a closet for ten years, the contents may be expired, stale, or too small. Your breakfast bars may be as rigid as hardtack. Consider these best practices: ​
Picture
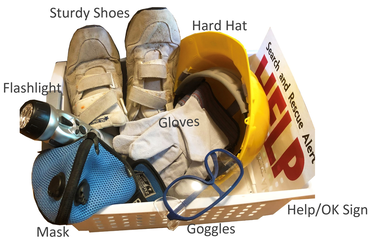
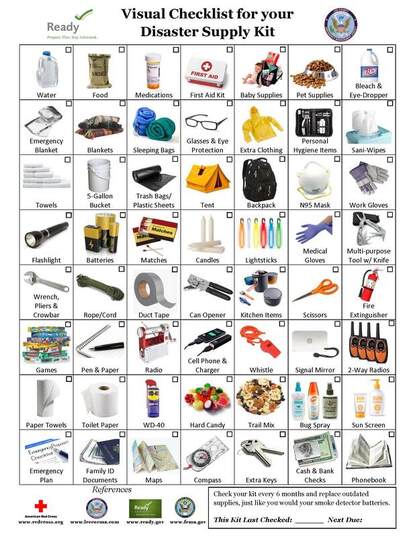
Click image to view Visual Checklist for Disaster Supplies.
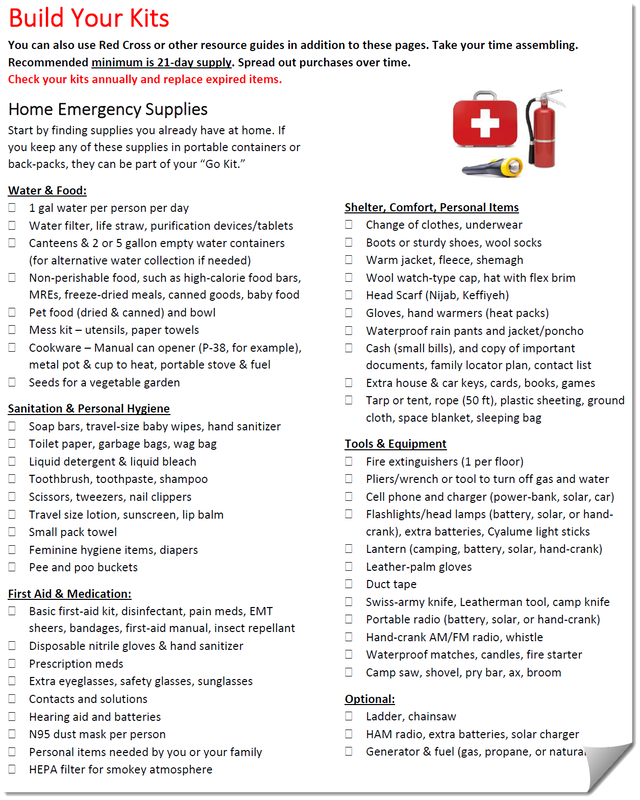
  • Review and repack seasonally, like in the Spring and again in the Fall. Add a reminder to your calendar. 
  • Rotate food items and medicines. Add expiration dates on each item and pack items that expire together to make this task easier. 
  • Change out seasonal clothes as weather conditions change. 
  • Keep an inventory of items in your emergency supplies. When disaster strikes, having a list of items will remind you of what you have without needing to rummage through everything. 
  • Note last-minute items that you use every day, and don't want to forget, such as your keys, wallet, glasses, refrigerated medicines, and so on. 


Resources & Checklists

Picture
Neighbors Ready! go bag checklists. You'll also find these lists in our "Get Prepared Now!" booklet, along with a lot more tips and information to help you get prepared. ​
Picture
FEMA Disaster Supplies Checklists. An extensive set of checklists, including checklists for a first aid kit, sanitation and hygiene supplies, equipment and tools, comfort items, food and water, clothes and bedding, and documentation and keys.   

Fire & Evacuation: Oregon Ready Set Go.  Sign up for TVF&R alerts. Know when to evacuate and what to do before you must go. Attend a Ready Set Go Webinar. Learn about the fire risk for your home and neighborhood, and how to prepare your home to reduce wildfire risk. 
Picture
Picture
Picture
Prep Tips for Seniors & Special Needs
  • "Disaster Preparedness For Seniors By Seniors," by the American Red Cross. 
  • Tip Sheet for disabled, people with special needs, and seniors
Prep Tips for families with children
  • Preparedness for children 
  • Preparedness tips for families with infants
  • Ready.gov Kids
​Prep Tips for Pets
  • Pet Disaster Kit Checklist by the CDC
  • Prepare Your Pets for Disasters" by Ready.Gov​


Contact Us
​About Us
Picture
Picture
© Neighbors Ready! 2024. All rights reserved.