NEIGHBORS READY!
  • Home
  • Family Prep
    • Go Bags
    • Stay Informed
    • Emergency Plan
    • Water Supplies
    • Sanitation and Hygiene
    • Food Plan
    • Home Hazards
    • First-Aid Plan
  • Community Prep
    • Neighborhood Prep
    • Be 2 Weeks Ready
    • > Community Hosts
    • Emergency Comms
    • Evacuation & Assembly
    • Community Caches
    • Training Opportunities
  • News & Events
    • Our Events
    • Ready! News
  • Hazards
    • Home Fires
    • Wildfires
    • Earthquakes
    • Tsunamis
  • Resources
    • QuakeUp! NW
    • Oregon.gov
    • Washington County Prep
    • Beaverton Emergency Mgmt
    • Tualatin Valley Fire & Rescue
    • CDC
    • FEMA
    • Ready.gov
    • Red Cross
  • About Us
  • Contact
    • Email Us
    • Newsletter Signup
    • Volunteer
Family Prep
Go Bags & Supplies
Stay Informed
Emergency Plan

Water Plan
Sanitation & Hygiene
Food Plan
​
Home Hazards
First-Aid Plan

Sanitation & Hygiene 

Safe water, toilets, and good personal hygiene are critical to your health and survival because they help prevent the spread of illness and disease. In a major disaster, like an big earthquake, our water and sewer systems will be damaged, rendering them unusable for weeks, months, and possibly years. Imagine no working toilets or faucets for 1 to 12 months! How will you stay clean? Do you have the materials needed to create a safe and functioning toilet and hand-washing station for your family? Creating your own sanitation and hygiene system is a "must do" for emergency preparedness. 
Where will you go, when you've got to go in a disaster?
You'll find the following information and tools on this page: ​
Picture
Click for 2-bucket toilet stickers; source: www.rdpo.net/emergency-toilet
  • ​Video: Sanitation in a Disaster
  • Personal hygiene preparedness
  • Hand-washing systems
  • Two-bucket emergency toilet​​
  • Privacy during a disaster​
  • Pet hygiene and waste
  • Waste disposal
  • Dealing with household trash
  • Pit toilets for rural areas
  • Septic system considerations
  • Laundry during a disaster
  • More resources

Video: Sanitation in a Disaster

Check out this video for how to prepare for sanitation in a disaster. Scroll down for additional information and instructions on how to assemble inexpensive sanitation and handwashing stations for your emergency supplies.

Personal Hygiene Preparedness

You can help yourself and your loved ones stay healthy by washing your hands often with soap and water, when available. For longer-term disasters, when indoor plumbing may not be available, you need to keep your body clean to avoid infection and skin irritations. Here are some short-term options to help conserve water: 
  • Baby wipes or other personal hygiene wipes
  • Dry shampoo
  • Alcohol-based hand sanitizer (60% - 95% alcohol is best for killing germs according to the CDC; however, hand sanitizer is not effective against norovirus)
  • Bleach and water combination: Add 1/8 teaspoon of bleach per gallon of water, stir and let stand for 30 minutes. 
Picture
Click to learn more from the CDC
Safety considerations: 
  • Use only clean water to brush your teeth; tap water may be contaminated following a disaster. 
  • Don't bathe in water that may be contaminated with sewage or toxic chemicals, or in streams or lakes contaminated by flood water, human sewage or animal waste.
  • Multiple people should not bathe in the same water. 
  • If you are drinking well water, listen to local health authorities for advice on using well water for showering and bathing
  • If extensive flooding has occurred or you suspect the well may be contaminated, contact your local health department for specific advice on well testing and disinfection. 
Picture
Source: South West Nebraska Public Health Department

Hand-Washing Systems

Picture
Hand hygiene is critical to preserving health. All you need for a hand-washing station is a jug of clean water (potable) with an on/off spigot, soap, towels, and a catch bucket for the used water. If possible, set up two hand-washing stations: one near the area where food is prepared and the other next to your emergency toilet to encourage people to wash their hands after using the bathroom. 
  • Soap and water are still the best long-term solution to cleanliness.  Antibacterial soap during a disaster is a good idea to help reduce the spread of disease. 
  • Hand sanitizer (over 60 percent alcohol) is important to have for emergency use when water isn’t handy.  It doesn't remove dirt and grease, but it helps to prevent spreading germs.  
  • Foaming hand soap is handy when your hands are visibly dirty.  It doesn’t require water to lather up, helping you to save your stored water supplies.

How to build a hands-free wash system 
The simplest way to make a hand-washing station is to place a water jug with a spigot on a table or counter, and drain it into a bucket or wash basin. You can also place a bucket underneath the sink and disconnect the plumbing to allow the sink to drain into a bucket. 
​Another option is to buy or construct a hands-free wash station. The CDC offers instructions on how to build a Tippy Tap.  It’s not difficult to put together, requires few moving parts, and will allow you to wash your hands without touching a spigot. A Tippy Tap is operated by a foot lever, and thus reduces the chance for bacteria transmission, as the user touches only the soap.  It uses only 2 ounces of water to wash your hands, versus 17 ounces using a bowl.  Download the instructions from the CDC on 
How to build a Tippy Tap. ​
Picture
Picture
A hands-free wash station reduces transmission of germs
Picture
Example of a tippy tap; click for CDC instructions
Picture
Click for instructions on how to build a tippy tap wash station

Two-bucket Emergency Toilet

In the aftermath of a disaster, people often feel vulnerable and scared. If your faucets and toilets aren't working, your family members will appreciate the comfort and safety of a simple twin-bucket toilet system. It's easy to put together and inexpensive. ​
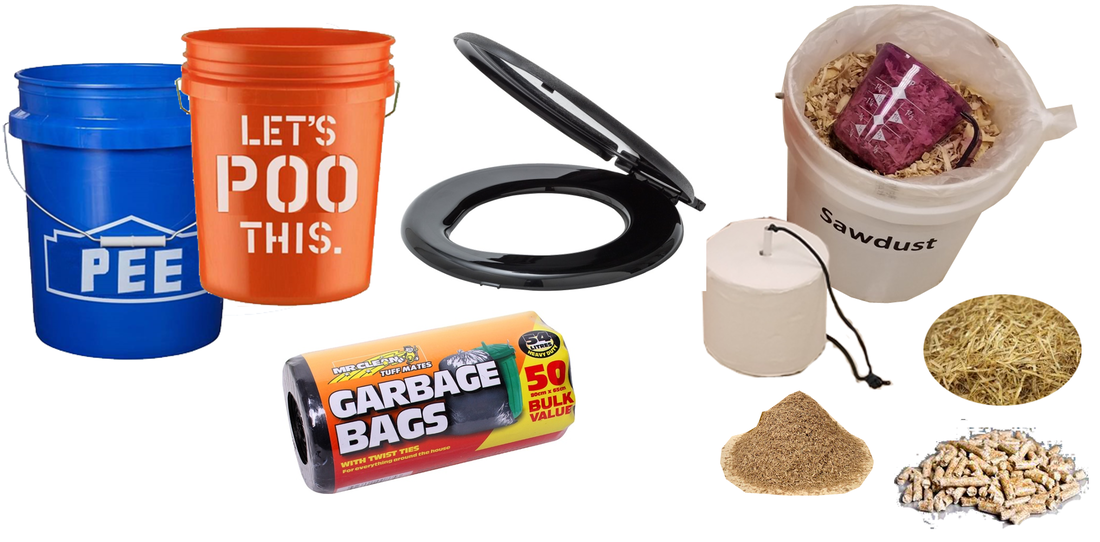
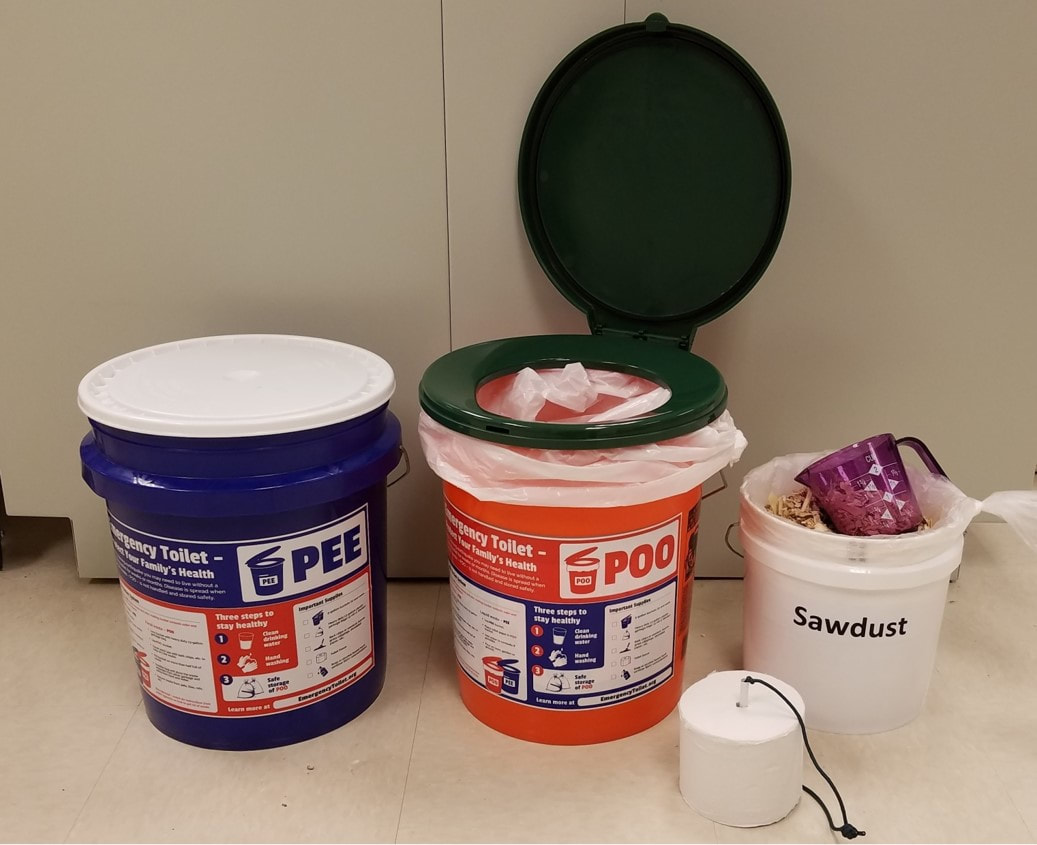
Why two buckets for a toilet? 
To separate pee and poo.  And why separate pee and poo? Most of the volume of your waste is in urine, and urine can be easily disposed of in the yard. Poo is a lot less volume and contains microorganisms that can cause dysentery, cholera and a whole host of dangerous diseases. For that reason, you need to keep poo separate and dispose of it carefully.
Also, most of the odor from porta-potties and public toilets comes from urine mixed with poo .  Keeping them separate provides a much less unpleasant environment. You can dilute pee one-to-one and pour it on the ground somewhere away from your living area.  It won’t breed bacteria there, and it won’t smell a lot.  And that takes care of most of your volume challenge.  There are differing instructions on diluting pee before disposing of it; some say 4 to 1 water; it shouldn’t be less than 1 to 1.
Picture
Picture
How to set up a 2-bucket toilet system
  • Get two plastic 5-gallon buckets. Home improvement stores, restaurants, or bakeries are great places to find inexpensive buckets or free used buckets. These buckets don’t need to be food-grade, but they do need to be sturdy enough to support your weight.
  • Label one bucket "pee" and one bucket "poo".  Download the ready-made labels or call your city or county emergency management departments to ask if they have free labels available to pick up. 
  • Purchase or make two toilet seats. You can adapt a regular toilet seat, or buy a seat that is designed for use with buckets. Most camping or outdoor sections of stores carry the a toilet seat with a lid that can fit onto a 5-gallon bucket. They snap on and off easily.
  • Buy a roll of sturdy, heavy-duty, plastic garbage bags (13 to 20 gallon size). Trash compactor bags are recommended, because they are stronger.  You are going to line your poo bucket with a bag so that you can empty your poo bucket simply and cleanly.  Don’t let the liner get more than half full before changing the liner. 
  • Supplies for cleanup. Purchase toilet paper, paper towels, hand sanitizer, soap, and disposable gloves (for times when you replace the garbage bag). Scroll down to learn how to build a hand washing station.  
  • Gather a supply of carbon-based material. This can be sawdust, shredded newspaper, bark chips, dry leaves,  peat moss, woodstove pellets – anything that’s compostable carbon.   Ask an office for a free bag of shredded paper.   Get a free bag of sawdust from a lumber yard.  The purpose of the carbon material is to create a cover layer in your poo bucket every time you use it.  This will fill up your bag liner faster, but there are important reasons to do this: covering up your poo will reduce odors, it will help keep flying insects away reducing the possibility of spreading infections, and the carbon will start the composting process for the waste, transforming it into a safe material faster. 
  • Store your supplies inside your buckets, so they are ready when you need them. 
Picture
Click to read article: "Is Pee Sterile? Here Is What the Science Says," Cleveland Clinic.
Is Pee Sterile? 
​
The quick answer is: No. Urine isn't sterile.

All things being equal, poop contains orders of magnitude more disease-causing bacteria than urine by unit mass. However, the myth that a healthy person’s urine is sterile is something medical professionals believed for a long time, according to the Cleveland Clinic (see article).  “Old lab testing techniques weren’t sensitive enough to pick up small amounts of bacteria,” Dr. Parekh said. “As the technology improved and we developed more advanced ways to test for bacteria, we learned that there actually are microbes and other contaminants in the urine. The levels are typically harmless for most people, but they’re still there.”
Can you get sick coming into contact with urine?
Urine is mostly made up of water. However, while it’s very uncommon, coming in contact with your urine or somebody else’s urine does have the potential to make you sick. For that to happen, the pee would probably need to enter either (1) an open wound or (2) one of your external mucus membranes (eyes, ears, nose, mouth, genitals, or anus). 
​
What does this mean for hygiene during a disaster? 
  • Wear personal protective equipment (gloves, googles or glasses) when handling human waste, including pee. 
  • Always wash your hands after going to the bathroom or handling waste waste. 
  • Do not drink urine or use it to treat wounds. Urine does not have antiseptic properties. In fact, it could make an injury or illness worse.​

Emergency Toilet Guidebook

Consider printing the Emergency Toilet Guidebook and including it with your emergency supply kit. You may not have the internet during a disaster, and may need this information for setting up your sanitation stations.
​You'll 
learn about a variety of sanitation methods for staying healthy after a disaster and specifics on how and where to dig a pit toilet. Check out the Public Alerts website for additional steps on creating a Toilet Plan and staying informed. 
The Emergency Toilet Guidebook was produced by the Regional Disaster Preparedness Organization (RDPO) of the Portland Metropolitan Region, with funding from the U.S. Department of Homeland Security/Urban Areas Security Initiative (UASI) grant program.  ​
Picture
Click to open. Source: RDPO
Picture
Click to open. Source: RDPO

Privacy During a Disaster

Picture
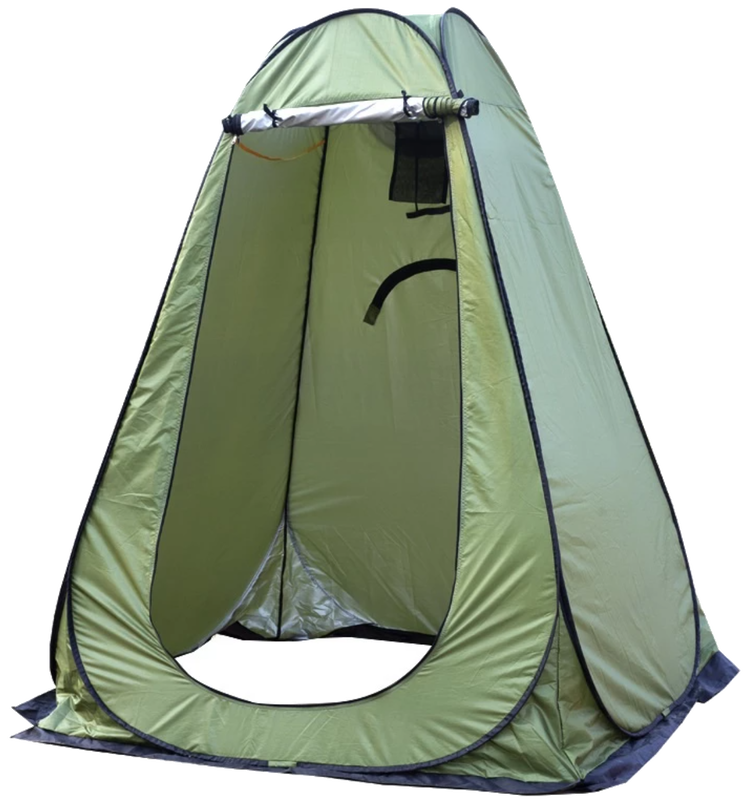
Where to Put Your 2-bucket system
For modesty, and to keep out of the rain,  there are shelters like this one you can buy at camping and sports stores, or you can construct your own.  Location depends on your particular circumstances – on your deck, on in a select place in the yard that is flat and easy to get to in the dark.  It’s important to have enough room to have pee and poo buckets next to each other so you can make sure the poo bucket always gets the toilet paper.  If you have a big enough bathroom and are still living in your house, why not put them there? You also need a wash station nearby, with a place to hold soap, water and towels.  There are lots and lots of do-it-yourself designs on line, and ideas for pouring water, because you are not going to be using your sink.  

Pet Hygiene and Waste

During a disaster, pet hygiene focuses on sanitation, safe waste disposal, and preventing disease by washing hands, keeping pets away from contaminated areas and wildlife, and regular cleaning of supplies, using items like litter, newspapers, plastic bags, disinfectant, and wipes to manage waste and clean carriers and bowls, all while maintaining a safe, controlled environment on a leash or in a carrier. 
Be sure to include the following items in your pet's sanitation kit: 
  • For cats: Litter, disposable litter pan (or a box with a plastic bag), scoop, and trash bags. 
  • For dogs: Poop bags, newspapers, paper towels, and disinfectant/bleach for cleaning up accidents. 
Best Practices During and After a Disaster
  • Hand Hygiene: Wash your hands thoroughly after handling pets, their food, or waste.
  • Waste Management: Use designated potty areas (even indoor ones with pads/towels if unsafe outside) and always clean up immediately. 
  • Containment: Keep pets on a leash or in a carrier to prevent contact with wildlife, stray animals, or hazards like contaminated water and debris. 
  • Water safety: Avoid stagnant or floodwater; provide fresh, bottled water for your pet. 
Picture
Pet carriers keep pets safe during a disaster. Image source: Chewy.com
Picture
Source: Melinda Beaumont

Waste Disposal

Picture
Always be careful when bagging your contents.  For example, wear disposable gloves, and afterwards, always wash your hands with soap and water, or alcohol-based hand sanitizer. Obviously, you may need to store your poo bags for quite a while, as pickup service is unlikely to be available for some period until utility services are restored. 
  • It’s important that you do NOT bury these bags, as animals can and will dig them up and rupture the bags and create a mess. 
  • If you have an extra garbage bin, that can be a safe temporary storage for your family.  Do NOT use recycle or garbage cans that you use for regular pickup by the garbage service. You won’t want to use it for that after you’ve been storing poo in it. Your poo bin will have to be separate and stay safe until public services resume and can come pick up your stored bags.
  • Your neighborhood might organize a common storage site that can be a temporary disposal station for a neighborhood’s waste for a time.  It needs to have sufficient capacity for the neighborhood, and be a secure container that is safe from children, pets, rats and flies.

Dealing with Household Trash

Work at reducing all household waste as an everyday practice. That way, it's not nearly as difficult when a disaster strikes. ​
Safety Considerations
  • Do not burn plastic, Styrofoam or other items that release toxins when burned. 
  • Be mindful of dry conditions and only burn trash in appropriate locations.
  • When burying trash, dig a hole at least 4 feet deep and cover it with at least 18 inches of soil to prevent insect and animal infestation. 
Best ways to dispose of household trash in a disaster 
  • Separate and compost food waste. 
  • Reduce bulk by smashing cans and boxes.
  • Compact where possible. 
  • Bury paper and compostable trash in shallow pits if you can. Bury trash as far away from your home as possible and be mindful of high-water tables. 
  • Layer garbage with soil, ashes, lime or borax to help control odors.

Pit Toilets for Rural Areas

If you live in a rural area, digging a pit toilet is a possible option. Also known as a latrine, a pit toilet is basically a hole in the ground that collects human waste (both pee and poo) in an emergency. It's ideal for more rural areas with wide open spaces. Its important to follow all location guides. It must be at least 10 feet from your residence, 10 feet from the property line, and 100 feet from any stream or water source.  All you need is a shovel. Learn where your underground utilities are to avoid hitting a utility line, and find out from your HOA, property manager, or multi-family dwelling unit if there are pre-identified locations for pit toilets.

Septic System Considerations

If your home has a septic system, its a good idea for your to know where it is located what it consists of before a disaster. It's important to know this anyway for maintenance purposes. If the level in your septic tank is high, sewage might not be leaving the tank. If the level is low, the tank itself may be damaged. You can usually examine the tank level when there is access to the ground-level inspection point. 
Signs your system is working: 
  • Your water supply is functioning.
  • You have electricity (some systems require power for a pump).
  • Toilets flush and sinks drain properly.
Signs you system is not working: 
  • The earth has moved around your septic system.
  • There are abnormal wet or soft spots in your yard. 
  • You smell sewage odors. 
  • Water or sewage is backing up in downstairs bathroom or floor drains. 
 If the level in your septic tank is high, sewage might not be leaving the tank. If the level is low, the tank itself may be damaged. You can usually examine the tank level when there is access to the ground-level inspection point. ​
What to do if your septic tank isn't working?
  • Limit the use of water in your home and use the two-bucket system or pit toilet option until repairs are made. 
  • Keep people and pets away from your septic system until it's back in service.
  • Only use a licensed professional to repair or replace your septic system. 
  • If sewage is staying below ground and not backing up, continued use should be okay. 
  • Avoid any scenario where exposure to or contact with waste could occur. 
Picture
Source: EPA, www.epa.gov/septic/types-septic-systems

Laundry During a Disaster

Disasters could cause you to be without electricity and the convenience of modern appliances, such as washing machines and dryers. While you can typically wear outer garments for several days before washing them, changing out or washing undergarments--especially underwear--helps limit infections and irritations. The Be 2 Weeks Ready curriculum recommends four alternative ways of washing your clothes: 
  • Washboard method: Rub the fabric against itself with your hands using a washboard
    Best for small batches of clothes. 
  • Laundry pod method: Non-electric, portable washing machine that resembles a salad spinner. Best for small batches of clothes. One gallon of water will wash one load. 
  • Bucket and Plunger method: Place dirty clothes, water and detergent in a bucket with a hole cut in the lid for a plunger. The plunger agitates the clothes. 
  • Sailor's Method: ​Fill a heavy-duty black garbage bag with dirty clothes, water and soap. Gently press on the bag to agitate the clothes. Best for washing large items such as blankets or sleeping bags. 
Picture
Picture
The Sailor's Method is best for larger items such as blankets or sleeping bags

More Resources

Check out these sources for more information and practice: 
Picture
Check out the Emergency Toilet Project
The Emergency Toilet Project
The Regional Disaster Preparedness Organization (RDPO) created the Emergency Toilet Project:  
  • Check out the Emergency Toilet Project website for tools and information on how to build an emergency toilet, including tips on where to find buckets for free and labels to download. 
  • Read the Emergency Toilet Guidebook to learn more about how to stay healthy after a disaster. ​

Water, Sanitation, and Hygiene after a Cascadia Disaster
In this video, you'll hear Brian Dobecki talk in depth about:
  • Water and sewage infrastructure vulnerabilities
  • Sanitation, including information on the 2-bucket emergency toilet, pit latrines, and septic systems
  • Hygiene, keeping your hands and body clean
Brian Dobecki is an Emergency Preparedness Trainer and Yamhill County CERT member. He spoke at our 2018 Cedar Hills Ready! QuakeUp! event. 

Picture
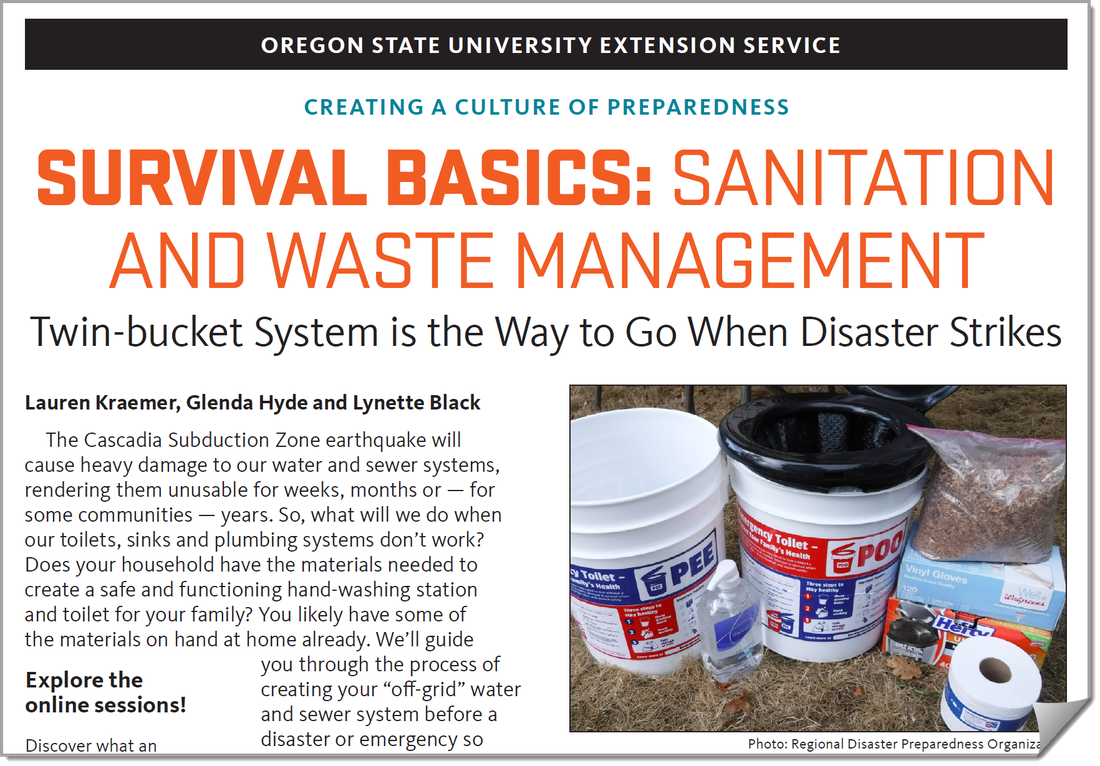
Click image to download the article.
Survival Basics: Sanitation and Waste Management
Written by Oregon State University Extension Service, this article concisely describes how to build a two-bucket toilet system and a hand-washing system for an emergency. 

Picture
Check out the Be 2 Weeks Ready program, Unit 5, Waste and Hygiene Plan. This program, developed by Oregon Emergency Management program, includes free curriculum and activities for communities. For more information on the full curriculum and how to get trained, check out our Be 2 Weeks Ready webpage. 
Contact Us
​About Us
Picture
© Neighbors Ready! 2026. All rights reserved.